Deploy Mailat on Dublyo
Deploy a self-hosted email platform with one click. Send transactional emails, manage a unified inbox, and run marketing campaigns — all on your own infrastructure with AWS SES.
Mailat is an open-source email platform that combines transactional email, inbox management, and campaigns into a single self-hosted app. It uses AWS SES for reliable email delivery at a fraction of the cost of services like SendGrid or Postmark — typically under $1 per 10,000 emails.
What's Included
- Transactional Email API — REST API and SMTP relay for sending emails from your apps
- Unified Inbox — Receive and read emails in a web-based inbox with real-time updates
- Custom Domains — Full DKIM, SPF, and DMARC authentication for each domain
- Stalwart Mail Server — Built-in SMTP/IMAP server for email client access (Outlook, Thunderbird, Apple Mail)
- Multiple Identities — Create sender identities with catch-all support
- DNS Setup Wizard — Automatic Cloudflare integration or zone file download for manual DNS setup
Prerequisites
Before deploying Mailat, you need an AWS account and a domain name. Dublyo handles the server, containers, HTTPS, and networking automatically.
| Requirement | Details |
|---|---|
| Dublyo Server | Minimum Standard (4 vCPU, 8 GB RAM) — recommended for production use |
| AWS Account | Free to create. You'll need IAM credentials with SES, S3, and SNS access |
| Domain Name | A domain you own (e.g., example.com) for sending and receiving email |
| DNS Provider | Access to manage DNS records (Cloudflare recommended for automatic setup) |
AWS Setup
Mailat requires three AWS services: SES for sending email, S3 for storing inbound emails, and SNS for real-time inbound notifications. Follow these steps to configure them.
Step 1: Create an IAM User
Go to AWS IAM Console
Navigate to IAM > Users > Create user. Name it something like mailat-ses.
Attach permissions
Attach the following AWS managed policies to the user:
AmazonSESFullAccessAmazonS3FullAccessAmazonSNSFullAccess
Create access keys
Go to Security credentials > Create access key. Choose "Application running outside AWS". Save the Access Key ID and Secret Access Key — you'll need them when deploying.
Step 2: Configure SES
Choose your SES region
Go to AWS SES Console and select a region. Supported regions: us-east-1 (N. Virginia), us-east-2 (Ohio), us-west-2 (Oregon), or eu-west-1 (Ireland). Remember which region you choose — you'll enter it during deployment.
Request production access
In SES, go to Account dashboard > Request production access. Describe your use case (e.g., "transactional email for my web application"). AWS typically approves within 24–48 hours.
Step 3: Create S3 Bucket for Inbound Email
Inbound emails are received by SES, stored temporarily in S3, then fetched by Mailat. You only need this if you want to receive emails (not just send).
Create an S3 bucket
Go to S3 > Create bucket. Name it something like mailat-inbound-emails. The bucket must be in the same region as your SES configuration. Keep default settings (private, no public access).
Add bucket policy for SES
Go to the bucket's Permissions > Bucket policy and add a policy that allows SES to write to the bucket. Replace BUCKET_NAME and ACCOUNT_ID with your values:
{ "Version": "2012-10-17", "Statement": [{ "Effect": "Allow", "Principal": { "Service": "ses.amazonaws.com" }, "Action": "s3:PutObject", "Resource": "arn:aws:s3:::BUCKET_NAME/*", "Condition": { "StringEquals": { "AWS:SourceAccount": "ACCOUNT_ID" } } }] }Deploy Mailat
Deploying Mailat on Dublyo follows a guided wizard. You'll create a server, configure your domain and DNS, enter your AWS credentials, and deploy — all from one page.
Step 1: Create a Server
If you don't have a server yet, create one first. Go to Servers in your Dublyo dashboard and click "Create Server". Name it (e.g., mailat-server) and pick a plan.
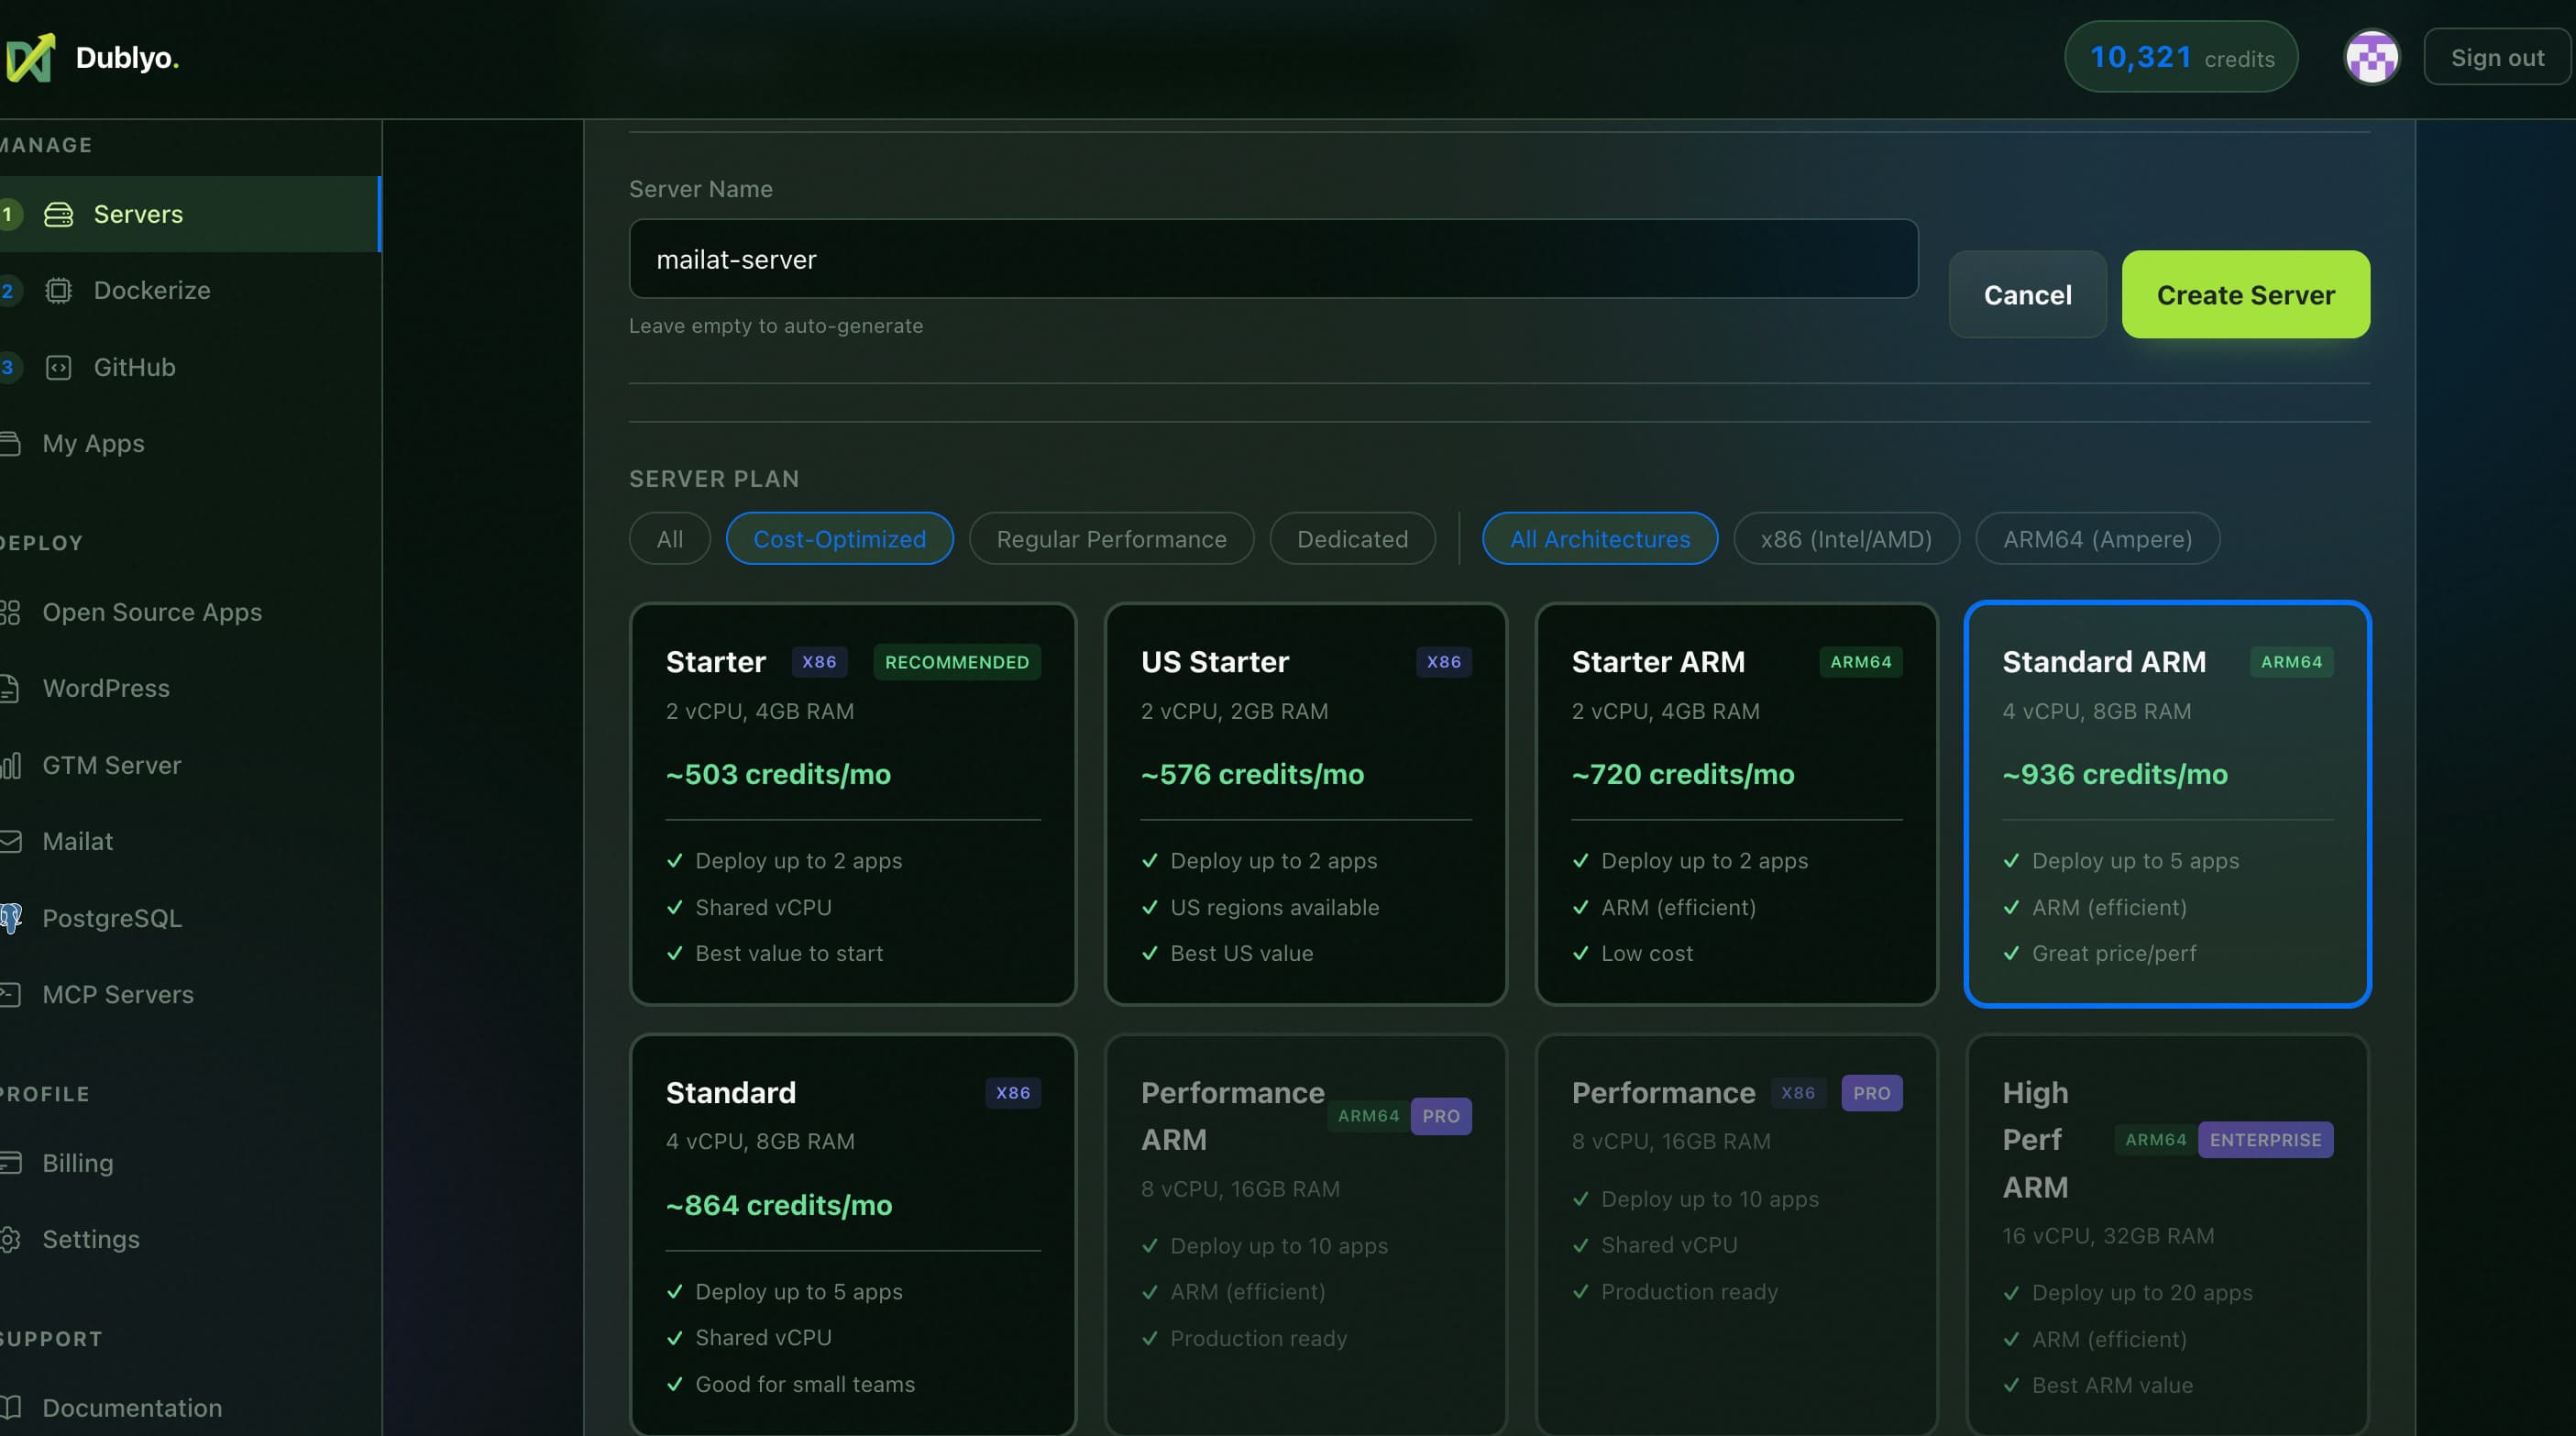 Name your server and select a plan. Standard ARM (4 vCPU, 8 GB) is recommended for Mailat.
Wait for the server to finish provisioning. Once it shows a green dot and an IP address, you're ready to deploy.
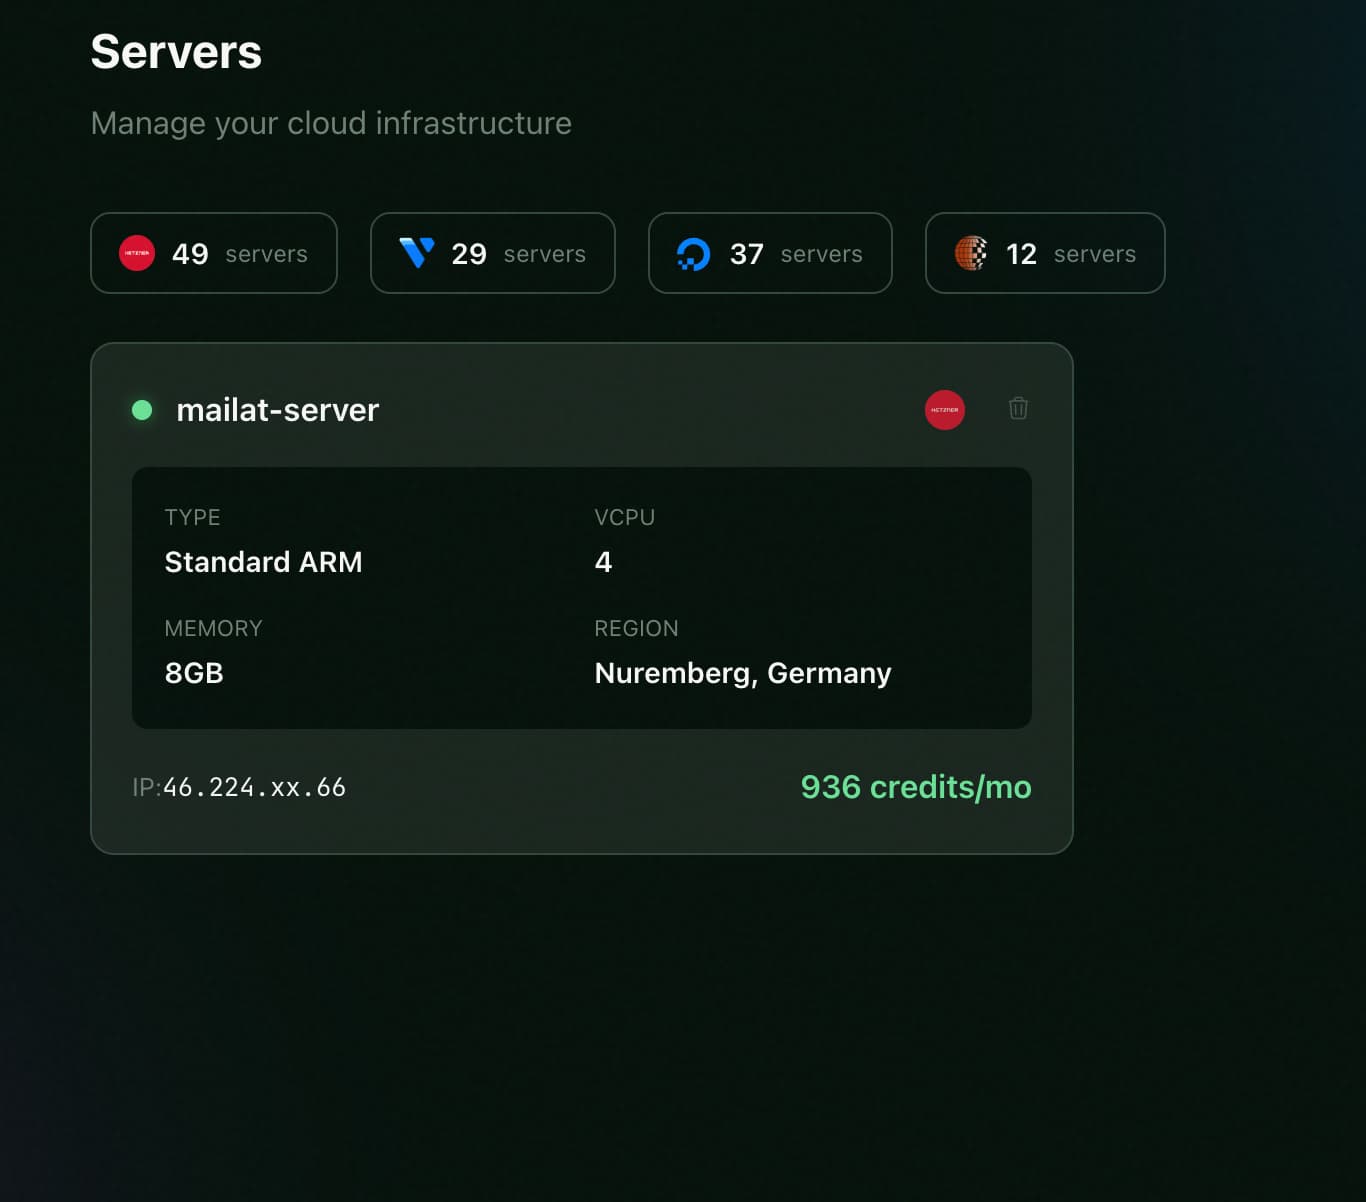 Your server is ready. Note the IP address — you'll need it for DNS.
Step 2: Start the Mailat Deploy Wizard
Go to the Mailat template
Navigate to Mailat in the sidebar, or go directly to dublyo.com/dashboard/mailat.
Select your server and enter a domain
Choose your running server from the dropdown. Then enter the domain you want for your Mailat instance (e.g., mail.example.com). The wizard will show you the A record to add.
Step 3: Configure DNS (Cloudflare)
Go to your DNS provider (Cloudflare recommended) and create an A record pointing your domain to your server's IP address.
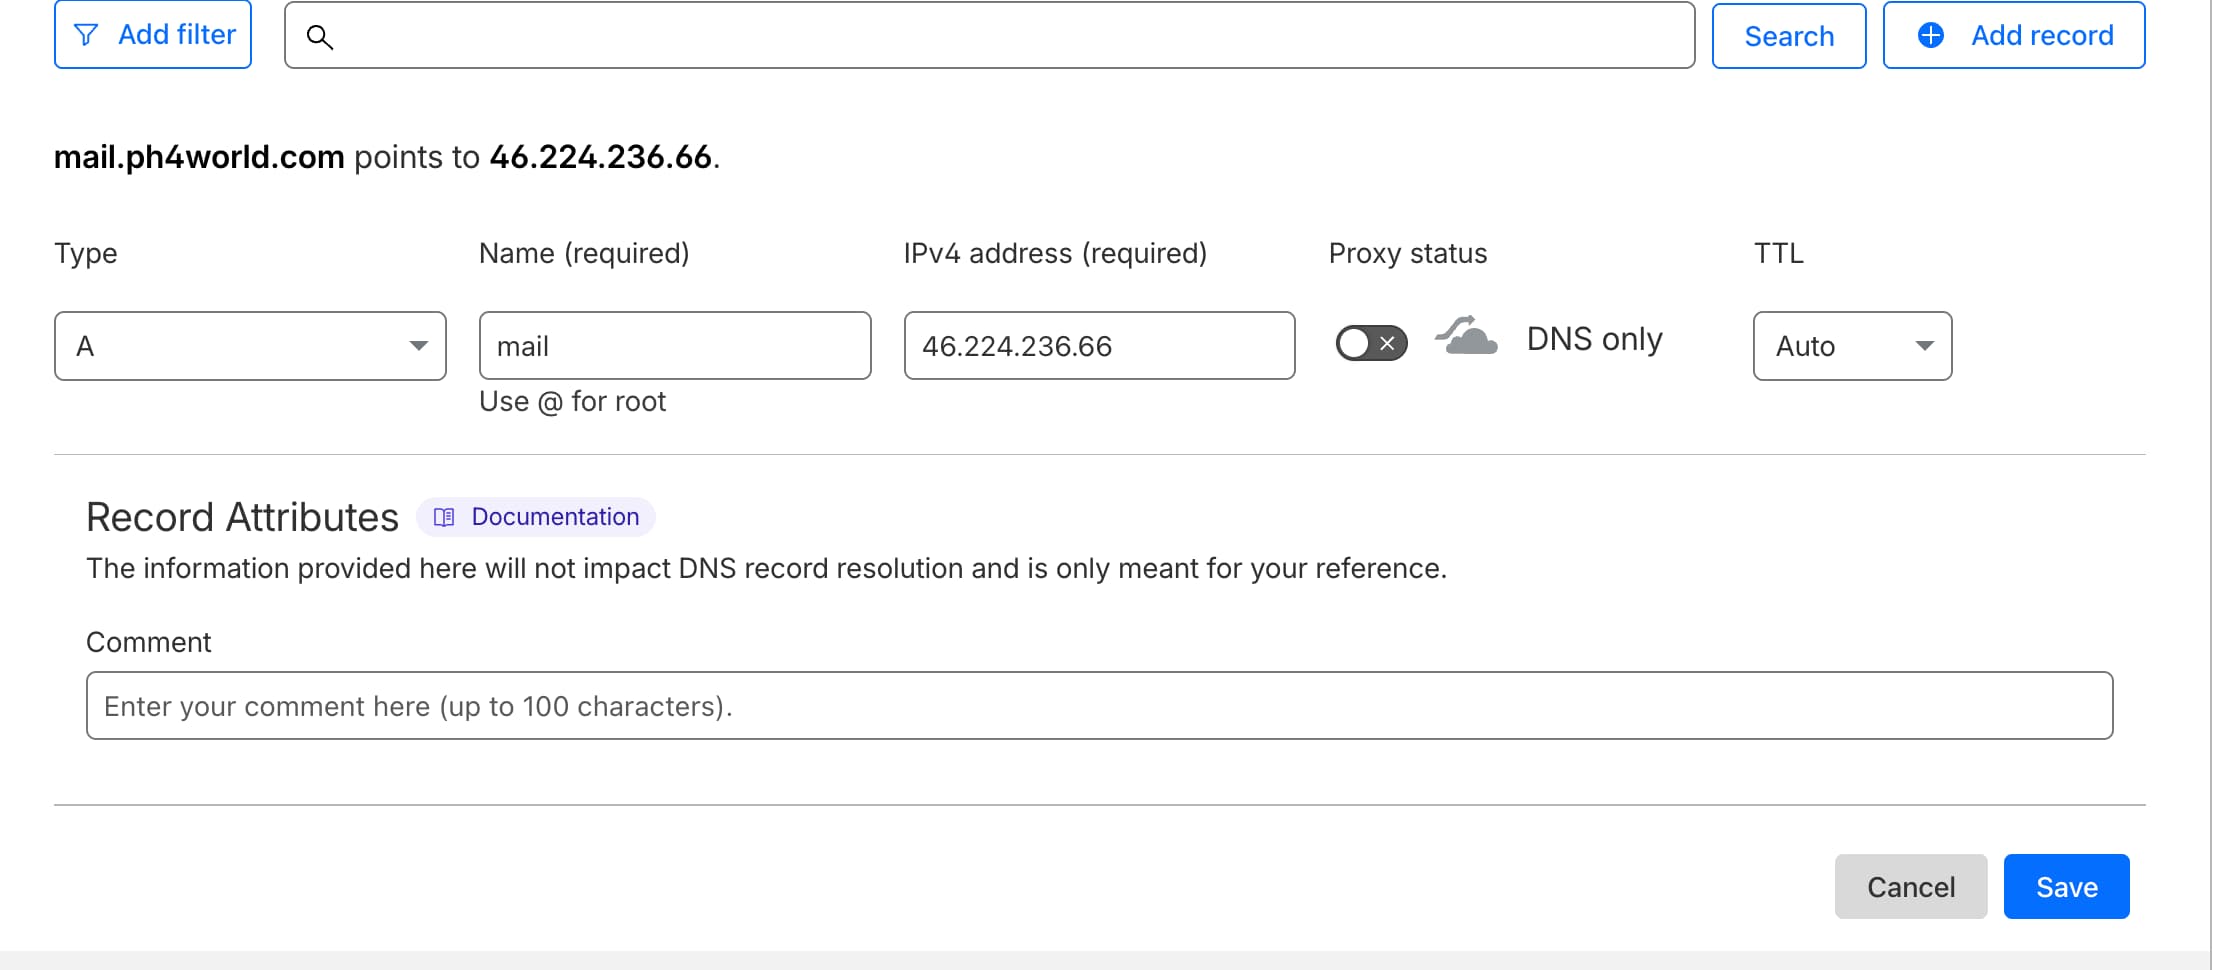 Add an A record in Cloudflare. Set Proxy status to "DNS only" (grey cloud) — this is required for mail ports to work.
Step 4: Verify DNS
Back in the Dublyo deploy wizard, click "Verify DNS". The wizard checks that your domain resolves to your server's IP. Once verified, you'll see a green confirmation.
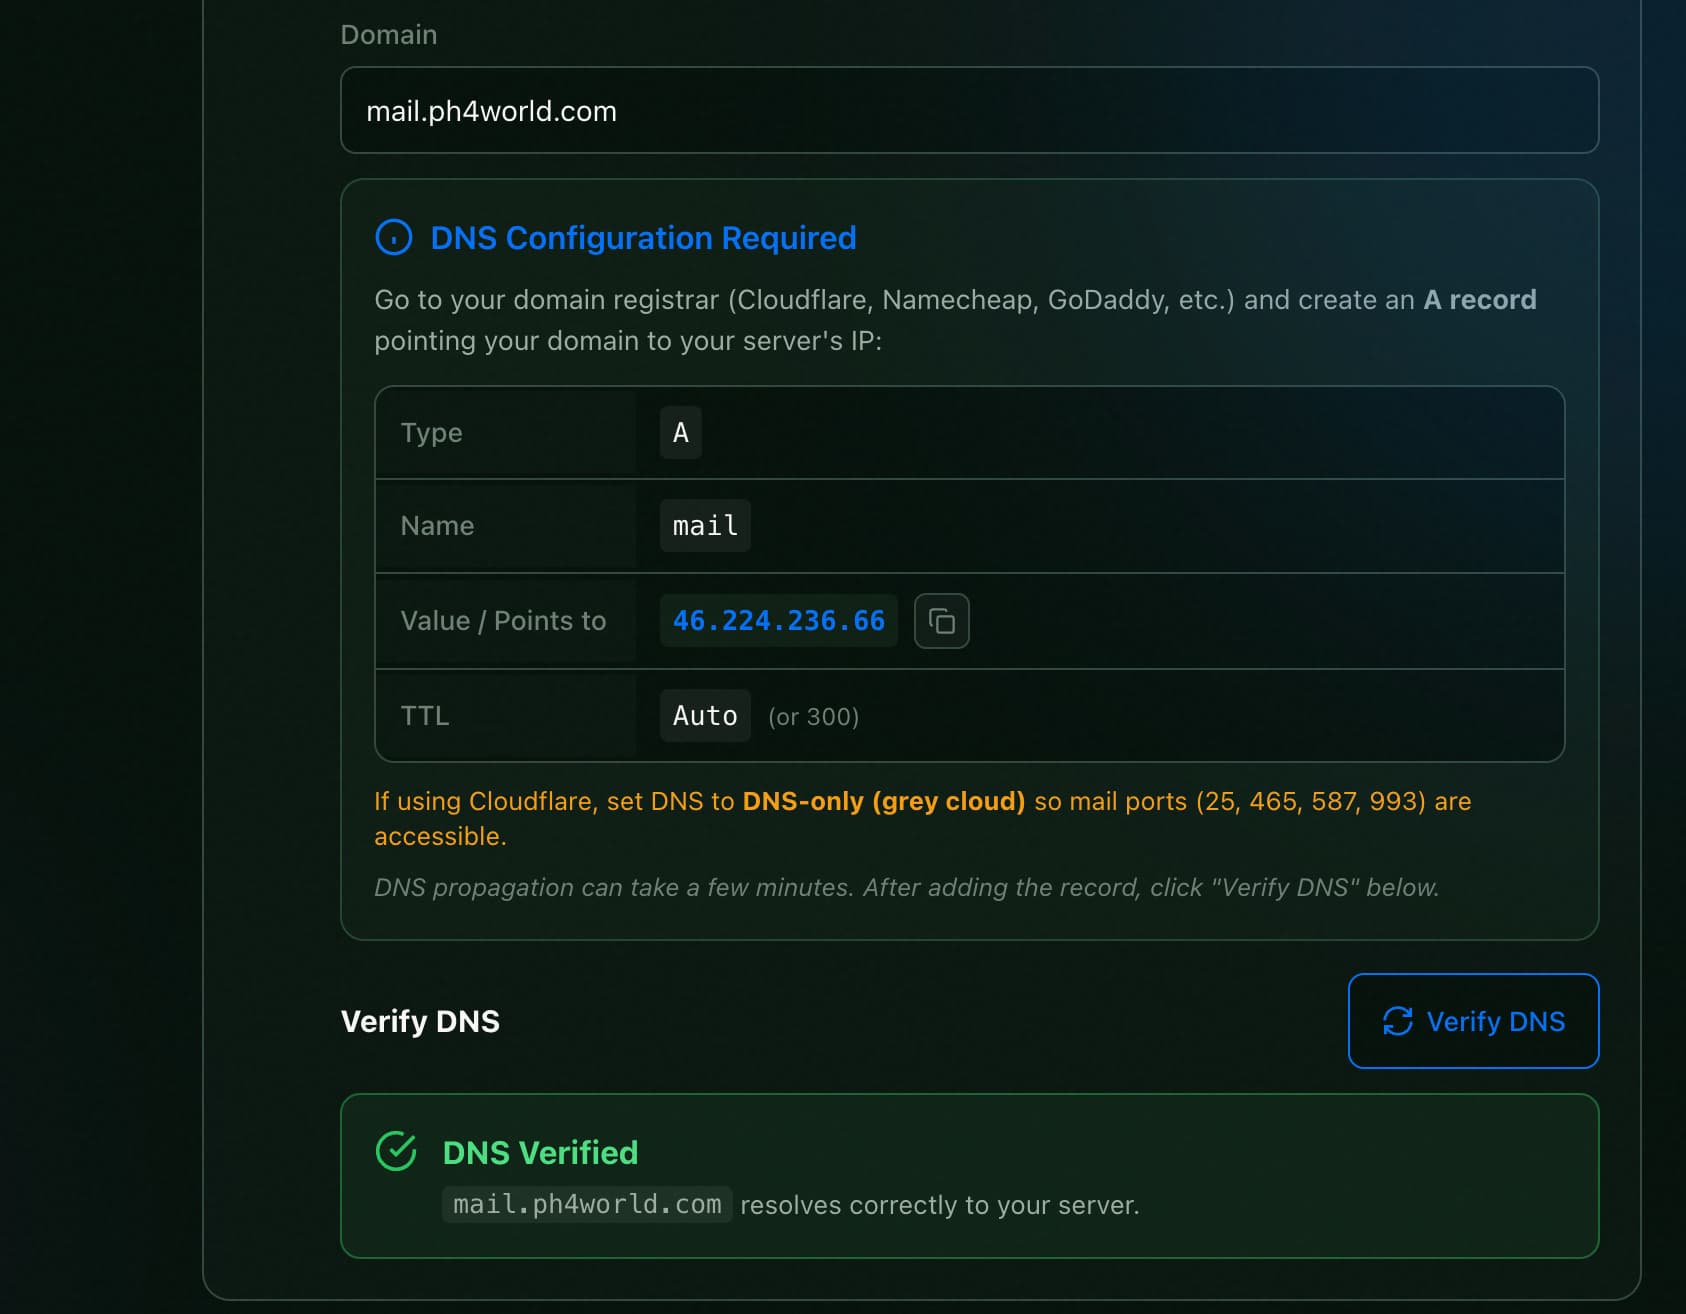 DNS Verified — your domain resolves correctly to your server. You can now proceed to AWS credentials.
Step 5: Enter AWS Credentials
Enter the IAM credentials you created earlier. The wizard tells you exactly which policies are needed and validates each one before deploying.
Fill in your AWS credentials
Select your AWS Region (must match where you configured SES), then enter your Access Key ID and Secret Access Key.
Click "Validate AWS"
The wizard checks that your IAM user has the required permissions: AmazonSESFullAccess, AmazonS3FullAccess, and AmazonSNSFullAccess. All three must show green checkmarks.
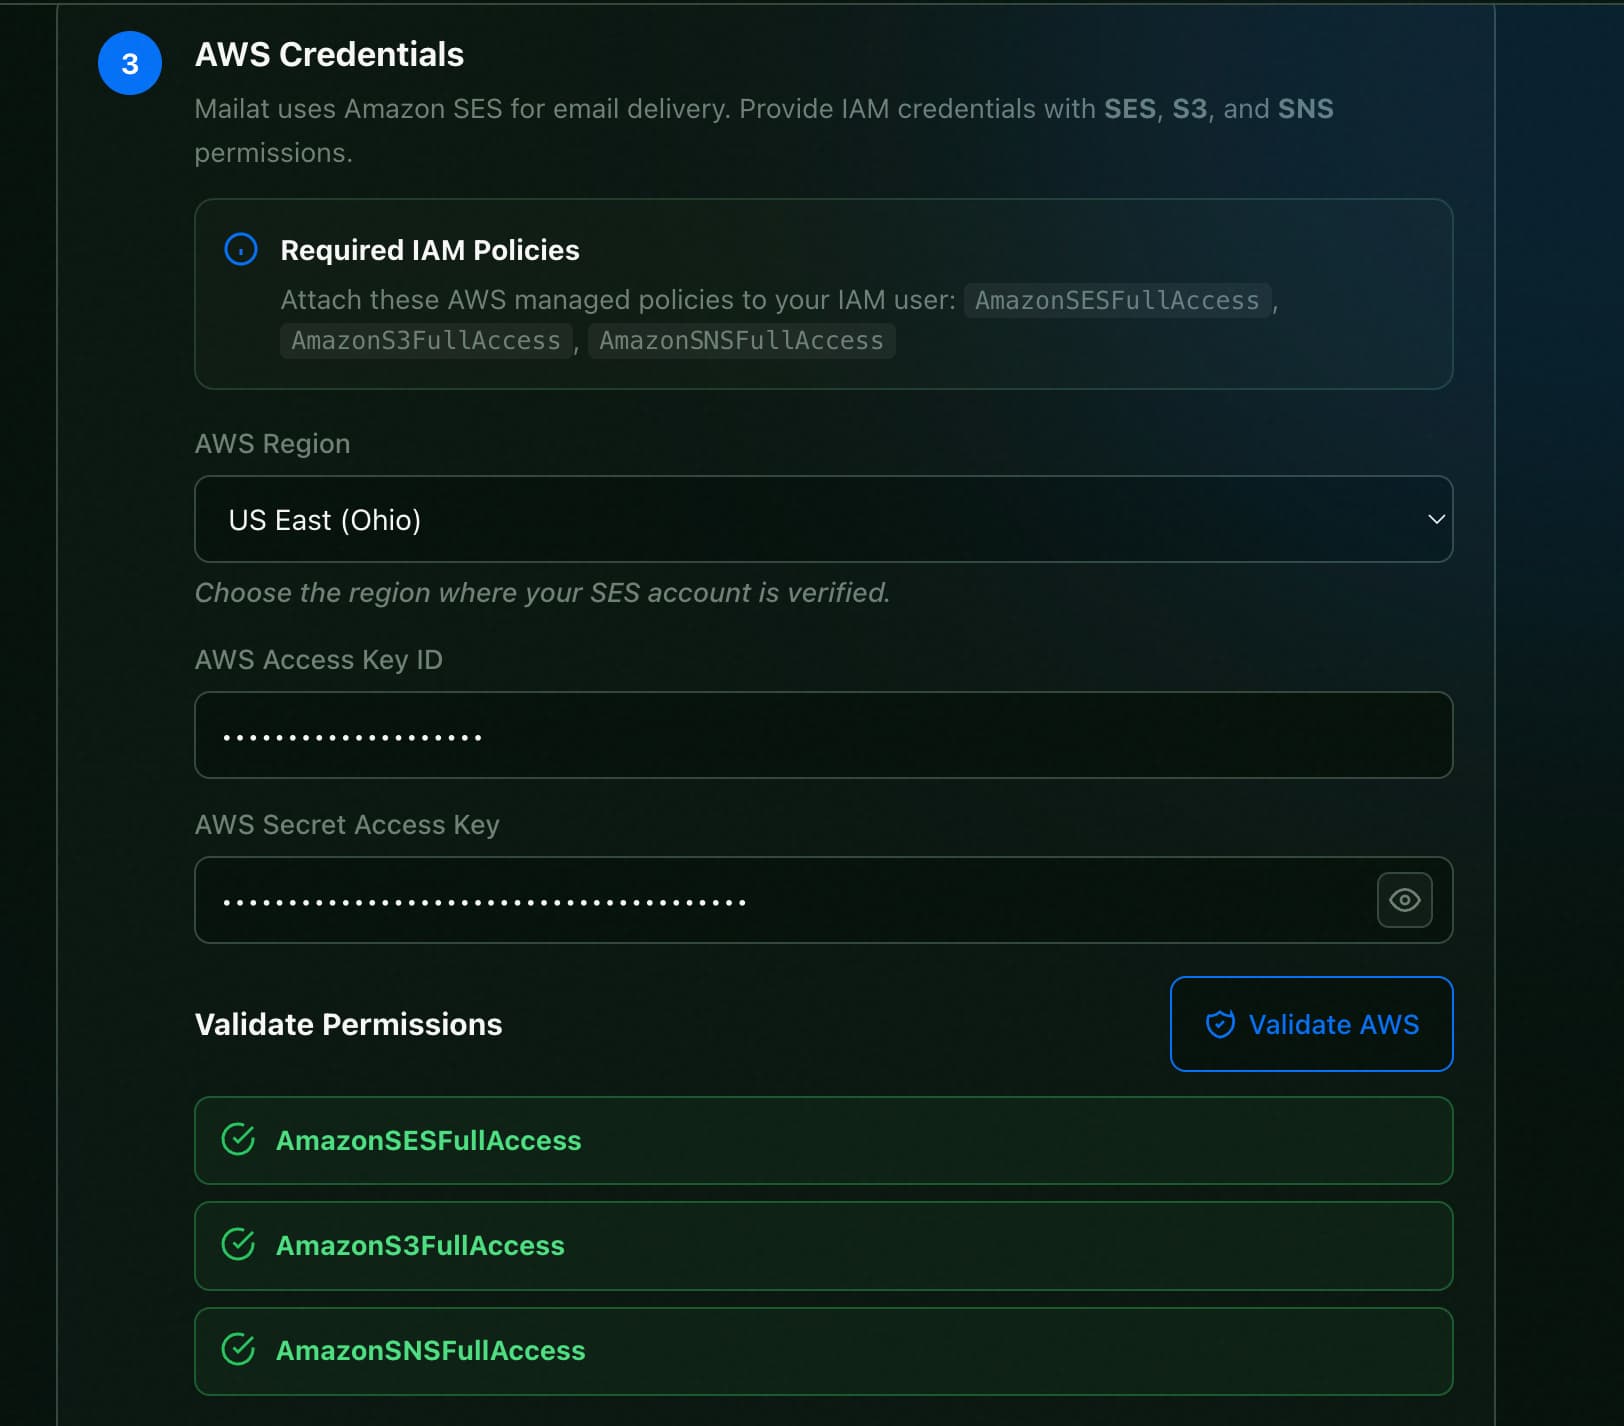 All three AWS permissions validated. Your credentials are stored encrypted and never exposed.
Step 6: Deploy
Click Deploy
All other fields (database password, JWT secret, encryption key, Stalwart token) are auto-generated securely. Click "Deploy" and wait for the stack to come up. This usually takes 1–2 minutes.
Step 7: Register Your Admin Account
Open your Mailat instance
Once deployed, go to your Mailat domain (e.g., https://mail.example.com). You'll see the login page.
Register the super admin
Click "Register" and create your admin account with a name, email, and password. The first user to register automatically becomes the super admin. Registration closes immediately after — no one else can register.
Domain Setup
After deploying, add your custom domain(s) to Mailat for sending and receiving email. Each domain gets full DKIM, SPF, DMARC, and MX authentication.
Add a Domain
Navigate to Domains
In the Mailat dashboard, go to Domains and click "Add Domain". Enter your domain name (e.g., example.com).
Run the Setup Wizard
Click "Setup" on your new domain. The wizard registers your domain with AWS SES and generates all required DNS records (DKIM, SPF, DMARC, MX).
Add DNS records
You have three options to add the required DNS records:
- Automatic (Cloudflare) — Enter your Cloudflare API token and the wizard adds all records automatically
- Zone file download — Download a DNS zone file and import it into Cloudflare (Dashboard > DNS > Import)
- Manual — Copy each record value and add them to your DNS provider one by one
Verify DNS
Click "Verify" to check that all records have propagated. DNS propagation usually takes a few minutes but can take up to 48 hours.
Required DNS Records
The setup wizard generates all of these automatically. Here's what gets added:
| Record Type | Purpose | Count |
|---|---|---|
| CNAME | DKIM authentication (3 tokens from AWS SES) | 3 |
| TXT | SPF record — authorizes SES to send on your behalf | 1 |
| TXT | DMARC policy for email authentication | 1 |
| MX | MAIL FROM subdomain for SES bounce handling | 1 |
| TXT | MAIL FROM SPF for the bounce subdomain | 1 |
| MX | Inbound email routing via SES (for receiving) | 1 |
Sending & Receiving Email
Sending Email
Once your domain is verified, you can send email through Mailat in several ways:
- Web Dashboard — Compose and send emails directly from the Mailat web interface
- REST API — Send programmatic transactional emails via the
/api/v1/emails/sendendpoint - SMTP Relay — Connect your app to the Stalwart SMTP server on port 587 for traditional SMTP sending
Receiving Email
Email receiving uses a pipeline: AWS SES receives inbound email, stores it in S3, sends a notification via SNS, and Mailat fetches and processes the email automatically.
Click "Setup Receiving"
On a verified domain, click "Setup Receiving". Mailat automatically creates the SES receipt rule, SNS topic, and S3 configuration.
Add the MX record
An MX record is shown in your domain's DNS records. Add it to your DNS provider. It points to inbound-smtp.{region}.amazonaws.com (e.g., 10 inbound-smtp.us-east-2.amazonaws.com).
Start receiving
Once the MX record propagates, inbound emails appear in your Mailat inbox in real time via SSE (Server-Sent Events) — no page refresh needed.
Email Client Access (IMAP/SMTP)
You can connect traditional email clients like Outlook, Thunderbird, or Apple Mail to your Mailat instance using the built-in Stalwart mail server.
| Protocol | Server | Port | Encryption |
|---|---|---|---|
| IMAP (incoming) | Your server's IP address | 993 | SSL/TLS |
| SMTP (outgoing) | Your server's IP address | 587 | STARTTLS |
Use the email address and password from your sender identity as the login credentials.
anything@example.com). n8n Integration
Automate your email workflows with the official n8n community node. Send emails, manage your inbox, and react to email events directly from n8n workflows.
Install the Node
In your n8n instance, go to Settings > Community Nodes > Install and enter:
n8n-nodes-mailatAvailable Operations
| Resource | Operations |
|---|---|
| Send, Send Batch, Get Status, Cancel | |
| Inbox | List, Get, Get Thread, Search, Reply, Mark Read, Delete, Star |
| Domain | List, Get |
| Identity | List, Get |
Webhook Triggers
The Mailat Trigger node starts workflows automatically when events occur:
- email_received — New email arrives in inbox
- email_sent — Email sent via transactional API
- contact_created / updated / deleted — Contact changes
- campaign_sent — Campaign started sending
- bounce_received — Email bounced
- complaint_received — Spam complaint received
Connect to Your Mailat Instance
Create an API Key
In your Mailat dashboard, go to Settings > API Keys and create a new key.
Add Credentials in n8n
Go to Credentials > New > Mailat API. Enter your Mailat instance URL and API key (starts with ue_).
Start Automating
Use the Mailat or Mailat Trigger nodes in your workflows to send emails, manage inbox, and react to events.
Configuration
Mailat is configured through environment variables during deployment. Most are auto-generated — you only need to provide your AWS credentials.
Environment Variables
| Variable | Required | Description |
|---|---|---|
AWS_REGION | Yes | AWS SES region (us-east-1, us-east-2, us-west-2, eu-west-1) |
AWS_ACCESS_KEY_ID | Yes | IAM access key with SES, S3, SNS permissions |
AWS_SECRET_ACCESS_KEY | Yes | IAM secret access key (stored encrypted) |
SES_CONFIGURATION_SET | No | Optional SES configuration set for delivery tracking |
DB_PASSWORD | Yes | PostgreSQL password (auto-generated) |
REDIS_PASSWORD | Yes | Redis password (auto-generated) |
JWT_SECRET | Yes | JWT signing key for authentication (auto-generated) |
ENCRYPTION_KEY | Yes | 32-byte key for encrypting stored secrets (auto-generated) |
STALWART_ADMIN_TOKEN | Yes | Admin token for Stalwart mail server (auto-generated) |
Stack Components
Mailat deploys as a stack of 5 containers:
| Container | Image | Purpose |
|---|---|---|
| web | mailat-web | Frontend dashboard (Nginx + Vue.js SPA) |
| api | mailat-api | Backend API server (Go) |
| db | postgres:16-alpine | PostgreSQL database |
| redis | redis:7-alpine | Cache and background job queue |
| stalwart | stalwartlabs/stalwart | SMTP/IMAP mail server (Stalwart) |
Troubleshooting
Running into issues? Here are solutions to the most common problems.
SES Sandbox Mode — Can't Send to External Addresses
If you can only send to verified email addresses, your SES account is still in sandbox mode.
- Go to AWS SES Console > Account dashboard and check your sending status
- Click "Request production access" if you haven't already
- Approval usually takes 24–48 hours
- While waiting, you can still test by verifying individual recipient addresses in SES
DNS Records Not Verifying
If domain verification is stuck at "pending":
- Double-check that all DNS records match exactly what Mailat shows (including trailing dots for CNAME values)
- Wait at least 15 minutes for DNS propagation
- If using Cloudflare, make sure the orange proxy cloud is disabled (DNS Only / gray cloud) for CNAME records
- Use
digor an online DNS checker to verify your records are visible:dig TXT example.com - Click "Verify" again after making corrections
Not Receiving Emails
If inbound emails aren't appearing in your inbox:
- Ensure "Setup Receiving" has been clicked and the MX record is added to your DNS
- Verify the MX record points to
inbound-smtp.{region}.amazonaws.com(e.g.,10 inbound-smtp.us-east-2.amazonaws.com) - Check that the S3 bucket exists and has the correct bucket policy allowing SES to write
- Make sure the S3 bucket is in the same region as your SES configuration
- Check the API container logs for any webhook processing errors
Stalwart IMAP/SMTP Connection Refused
If email clients can't connect:
- Verify ports 587 (SMTP) and 993 (IMAP) are open on your server's firewall
- Use your server's IP address (not the domain) as the mail server hostname
- The username is your full email address (e.g.,
admin@example.com) - The password is the one you set when creating the sender identity in Mailat
First Registration Fails
Mailat only allows one registration — the first user becomes the super admin. If registration appears closed:
- Someone may have already registered. Try logging in instead
- If you need to reset, check the database container's
userstable
Need Help?
Can't find what you're looking for? Check the full documentation or reach out.